Once the mode has been established, the next step is to configure the WAN lines. The Configure WAN page contains the settings for all configured ISP connections on the Ecessa device. The network example below will be utilized throughout this section to illustrate the correct configuration of WAN lines on the Ecessa device for Routed, Translucent, and NAT Mode.

The firewall has these existing rules:
| DIRECTION | LAN IP | WAN IP |
|---|---|---|
| Both | 192.168.100.10/32 | 172.20.1.61 |
| Both | 192.168.100.20/32 | 172.20.1.62 |
| Outbound | 192.168.0.0/24 | 172.20.1.58 |
DNS is setup as follows:
| DNS RECORD | RECORD TYPE | IP ADDRESS |
|---|---|---|
| www.test.com | A | 172.20.1.61 |
| ftp.test.com | A | 172.20.1.61 |
| smtp.test.com | A | 172.20.1.62 |
| – | MX | smtp.test.com |
In order to configure the Ecessa device for our WAN lines, the following information is required:
- The name of the Alias for each WAN line.
- The IP address which will be assigned to the Ecessa’s WAN interface for each ISP connection.
- The subnet mask for each ISP connection.
- The IP of the ISP device for each WAN connection.
- The physical interface that will be configured for each connection.
- The Uplink and Downlink speed for each WAN connection (used for the Ecessa devices Load Balancing).
Routed Mode
In this first example, the device will be configured in Routed Mode because the subnet mask of our existing WAN line meets the requirements listed previously. Based on the fact that we have inbound services on 172.20.1.61 and 172.20.1.62 IP addresses, we will choose to change the firewall configuration versus changing the configuration of the ISP device. Displayed below is the updated diagram depicting the new Routed Mode configuration.

A new address mapping table has been generated to keep the configuration organized and well documented.
|
NOTES |
FIREWALL EXTERNAL ADDRESS |
FIREWALL INTERNAL ADDRESS |
WAN1 |
WAN2 |
| www.test.com | 172.20.1.61 | 192.168.100.10 | 172.20.1.61 | 10.50.0.21 |
| ftp.test.com | 172.20.1.61 | 192.168.100.10 | 172.20.1.61 | 10.50.0.21 |
| smtp.test.com | 172.20.1.62 | 192.168.100.20 | 172.20.1.62 | 10.50.0.22 |
| MX RR | 172.20.1.62 | 192.168.100.20 | 172.20.1.62 | 10.50.0.22 |
| Global NAT | 172.20.1.61 | 192.168.0.0/24 | 172.20.1.61 | 10.50.0.21 |
Notice how the Global NAT rule on the firewall had to change from 172.20.1.58 to 172.20.1.61. This is because available IP addresses are lost when doing a Routed Mode installation.
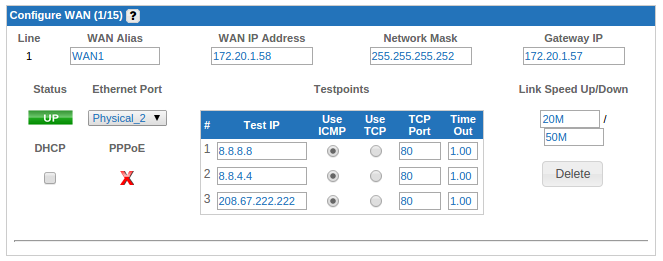
Based on this information, our WAN1 in Routed Mode would appear as below:
Translucent Mode
In this example, the Ecessa device will be configured using Translucent Mode. Configuring the device in Translucent mode would conserve IP addresses (vs Routed mode) and would not require reconfiguration of the firewall. The diagram below shows how the Translucent mode would be addressed.
![]()
Notice how the NAT rules on the firewall all stay the same when using Translucent mode. The only additional configuration that is needed is the update of the DNS records if the Ecessa device will become the authoritative DNS for the domain.
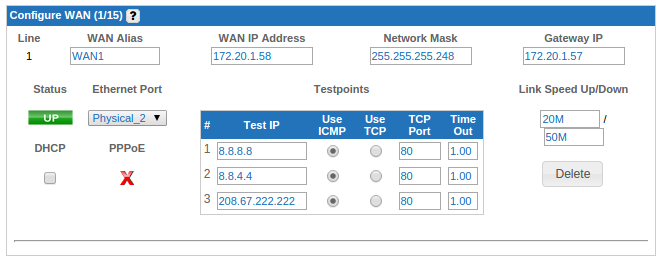
Based on this information, our WAN1 in Translucent Mode would appear as below:
![]()
NAT Mode
Finally, the Ecessa device could also have been configured using NAT Mode. The diagram below shows how the NAT Mode would be addressed.

Our updated address mappings would have been the following:
|
NOTES |
FIREWALL EXTERNAL ADDRESS |
FIREWALL INTERNAL ADDRESS |
WAN1 |
WAN2 |
| Global NAT | 192.168.1.58 | 192.168.0.0/24 | 172.20.1.58 | 10.50.0.18 |
| www.test.com | 192.168.1.61 | 192.168.100.10 | 172.20.1.61 | 10.50.0.21 |
| ftp.test.com | 192.168.1.61 | 192.168.100.10 | 172.20.1.61 | 10.50.0.21 |
| smtp.test.com | 192.168.1.62 | 192.168.100.20 | 172.20.1.62 | 10.50.0.22 |
| MX RR | 192.168.1.62 | 192.168.100.20 | 172.20.1.62 | 10.50.0.22 |
Our WAN1 in NAT Mode looks like this:
Note: the only two differences are the subnet mask and the Routing checkbox is enabled.
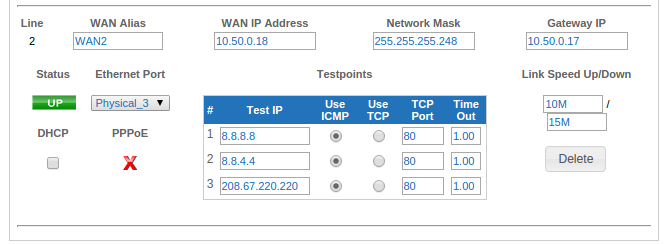
WAN2 is configured similarly regardless of Routed, Translucent, or NAT Mode.
When you are ready to complete the addition of each WAN connection, click Add to the right of the configuration options. Click Activate at the bottom of the page to save changes made to the Configure WAN page when finished.
Although most WAN connections are configured similarly, there are exceptions which are not covered in this manual. If there are any questions about how to configure the WAN connection within your environment, refer to our help page contact Ecessa Technical Support at help@ecessa.com, or call
(800) 669-6242 x 2.
0 Comments