This article describes how to create the Office 365 DNS records described in the Microsoft support article here: Create DNS records for Office 365 at any DNS hosting provider
Add a TXT record for verification
- The Owner field is left blank

Add MX record to route email
- The Host Name is entered in the format priority;hostname
- The priority 0 is not supported so you may use 1 to make this record the highest priority
- The Host Name cannot be @ and it must be unique. Entering something like mx1 or mxo365 as shown in the below image will work.
- The Mail Entry selection will be set to Yes and the CNAME box should be checked.

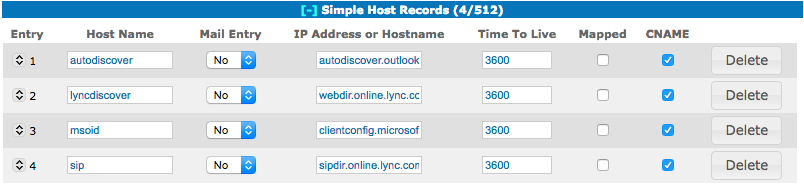
Add four CNAME records
- The CNAME box should be checked.
Add a TXT record for SPF to help prevent email spam
- The Owner field is left blank. If there is an SPF checkbox in your software version it should not be checked.

Add two SRV records
- The _ characters are added automatically so they should not be typed into the Service or Protocol fields.
- The Host Name must end with a dot on the end such as 'sipdir.online.lync.com.'

0 Comments